Quick Start Guide
WordPress DataLayer Tracking Setup: Get Advanced DataLayer Tracker Running in 10 Minutes

Welcome to Advanced DataLayer Tracker
Advanced DataLayer Tracker (ADT) is a comprehensive WordPress plugin that provides enterprise-level event tracking with zero coding required. This guide will help you get your first events tracking quickly.
This comprehensive WordPress event tracking tutorial covers everything from initial WordPress DataLayer tracking setup to advanced Google Tag Manager WordPress setup guide integration. Whether you’re implementing a WordPress form tracking plugin or setting up WordPress analytics active time tracking, this guide walks you through each step with zero coding required.
Prerequisites
Before starting, ensure you have:
Required:
- WordPress site with admin access
- ADT plugin installed and activated
- Google Tag Manager account (recommended) OR Google Analytics 4 property
Time Required: 10-15 minutes
Step 1: Access Plugin Settings
- Log into WordPress Admin
- Navigate to: Settings → Advanced DataLayer
- You’ll see the ADT settings dashboard with multiple tabs
Step 2: Choose Your Integration Method
ADT supports three tracking methods. Choose the one that fits your needs:
Option A: Google Tag Manager (Recommended)
Best for: Most websites, especially those using multiple marketing platforms
Setup Steps:
- Click the GTM Export tab
- Select features to include (start with Core Features)
- Click Generate GTM Container
- Download the JSON file
- Import to Google Tag Manager (Admin → Import Container)
- Publish your GTM container
Benefits:
- Send data to multiple platforms (GA4, Meta, TikTok, etc.)
- No-code event management
- Flexible routing and filtering
- Marketing team control
Full guide: Complete Google Tag Manager WordPress Setup Guide
Learn more about Google Tag Manager setup

Option B: GA4 Measurement Protocol (Server-Side)
Best for: Direct GA4 connection, enhanced privacy, no client-side tags
Setup Steps:
- Click the GA4 Settings tab
- Enter your GA4 Measurement ID (G-XXXXXXXXXX)
- Enter your GA4 API Secret (from GA4 Admin → Data Streams → Measurement Protocol)
- Configure which events to send server-side
- Save settings
Benefits:
- Ad blocker resistant
- Enhanced privacy
- Reduced client-side load
- Direct GA4 connection
Full guide: WordPress Analytics Active Time Tracking & Session Management
Google Analytics 4 official documentation
Option C: Pixel Manager Integration
Best for: Sites already using third-party pixel managers
Setup Steps:
- Ensure your pixel manager is installed
- ADT automatically populates the dataLayer
- Configure your pixel manager to read ADT events
- No additional ADT configuration needed
Full guide: Pixel Manager Guide
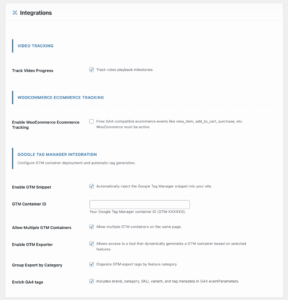
Step 3: Enable Core Features
Navigate to the Core Settings tab and enable essential tracking features:
Must-Have Features (Enable First)
Page Tracking:
- Enable Page View Tracking
- Provides foundation page context
Engagement Tracking:
- Enable Active Time Tracking (measures true engagement)
- Enable Scroll Depth Tracking (content consumption)
- Enable Click Tracking (user interactions)
Session Management:
- Enable Session Tracking
- Creates persistent session data across pages
Form Tracking:
- Enable Form Tracking
- Automatically detects form starts and submissions
High-Value Features (Enable Second)
Video Tracking (if you have videos):
- Enable Video Tracking
- Tracks play, progress, and completion
E-commerce Tracking (if using WooCommerce):
- Enable WooCommerce Integration
- Automatically tracks product views, cart actions, and purchases
UTM Tracking:
- Enable UTM Parameter Tracking
- Captures campaign attribution data
WooCommerce official documentation
Step 4: Configure Consent Management (Important)
ADT respects user privacy and integrates with consent management platforms.
Setup Steps:
- Navigate to Consent Settings tab
- Select your consent platform (or choose “Manual Configuration”)
- Map consent categories to tracking features:
- Analytics: Page views, engagement, sessions
- Marketing: UTM tracking, attribution
- Advertising: Pixel integrations, remarketing
If you don’t use a CMP:
- Select “No Consent Platform”
- ADT will track all events immediately
Full guide: Consent Management Guide
GDPR compliance information: GDPR cookie compliance guidelines
Step 5: Verify Events Are Firing
Now let’s confirm everything is working correctly.
Using the Debug Overlay
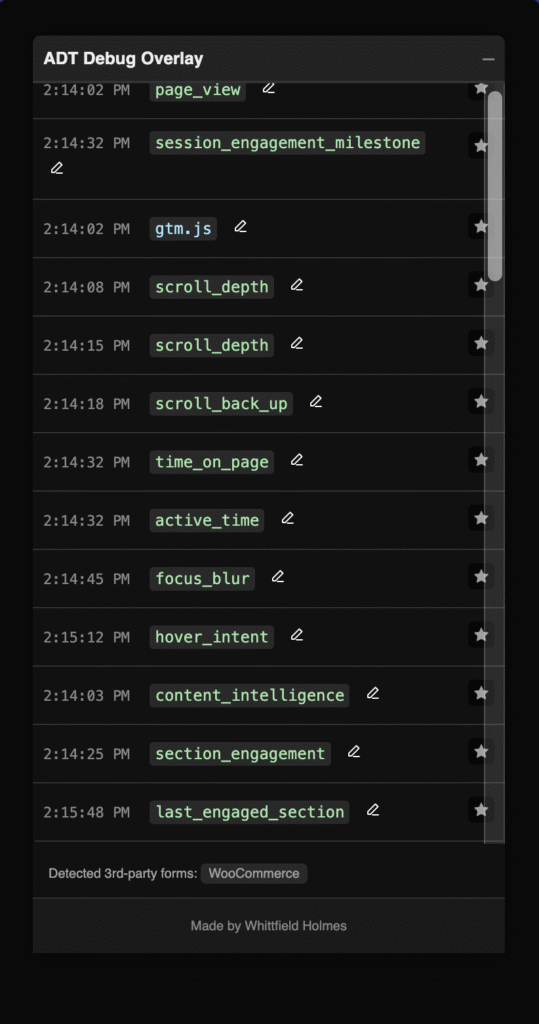
Steps:
- Visit your website (frontend)
- Open browser console: Press F12 (Windows) or Cmd+Option+J (Mac)
- Type:
ADT.debugOverlay.open() - The ADT Debug Overlay appears on screen
What to check:
- Session ID displays correctly
- Page view event shows in event log
- Scroll the page → scroll_depth events fire at 25%, 50%, 75%, 100%
- Wait 30 seconds → active_time event fires
If nothing appears:
- Check browser console for JavaScript errors
- Verify plugin is activated
- Confirm no JavaScript conflicts with other plugins
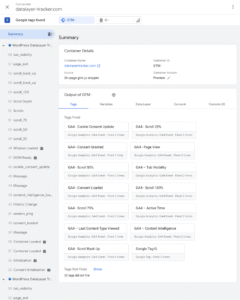
Using Google Tag Manager Preview Mode
If using GTM:
- Open GTM workspace
- Click Preview button
- Enter your website URL
- GTM Preview panel appears
- Navigate your site and watch events fire in real-time
Events to verify:
- page_view fires on every page load
- scroll_depth fires as you scroll
- form_start fires when focusing on a form field
- active_time fires every 30 seconds of activity
Using GA4 DebugView
If using GA4 Measurement Protocol:
- Open Google Analytics 4
- Navigate to: Admin → DebugView
- Visit your website
- Events appear in DebugView within seconds
Note: DebugView shows real-time events for testing purposes.
Step 6: Understand Key Events
Now that events are firing, here’s what they mean:
page_view
Fires when: Page loads
Why it matters: Foundation event providing page context
Key data: Page URL, title, type, referrer
active_time
Fires when: User actively engages (every 30s)
Why it matters: TRUE engagement measurement (not just background tabs)
Key data: Active seconds, total time, engagement rate
scroll_depth
Fires when: User scrolls 25%, 50%, 75%, 100%
Why it matters: Content consumption measurement
Key data: Scroll percentage, time to reach depth
form_start
Fires when: User focuses first form field
Why it matters: Indicates form intent
Key data: Form name, field count, vendor
form_submit
Fires when: Form successfully submitted
Why it matters: Conversion tracking
Key data: Form name, submission ID
session_engagement_summary
Fires when: Session ends (tab close, navigation away)
Why it matters: Complete session analysis with quality scoring
Key data: Total active time, pages viewed, engagement score, attribution data
Full event reference: Complete Event Guide
Step 7: Build Your First Report (GA4)
Let’s create a simple report to see your data in action.
If using GA4:
- Open Google Analytics 4
- Navigate to: Reports → Engagement → Events
- You’ll see ADT events in the list
Create a custom exploration:
- Navigate to: Explore (left sidebar)
- Click Blank template
- Dimensions: Add
event_name,page_location - Metrics: Add
event_count,active_users - Drag dimensions to Rows
- Drag metrics to Values
- Apply
What you’ll see:
- Which events fire most frequently
- Which pages generate the most engagement
- How many users trigger each event
Example insights:
- High scroll_depth on blog posts = engaging content
- High form_start but low form_submit = form friction
- High active_time on product pages = strong interest
Common Issues and Solutions
Events Not Firing
Check:
- Plugin is activated
- No JavaScript errors in browser console
- GTM container is published (if using GTM)
- Consent is granted (if using consent management)
- Events are enabled in ADT settings
Debug:
- Open browser console (F12)
- Check for
window.dataLayerarray - Verify ADT object exists: type
ADTin console - Look for error messages
GTM Container Won’t Import
Solution:
- Ensure you’re importing to the correct container
- Use “Merge” import option (not “Overwrite”)
- Check GTM account permissions
- Verify JSON file downloaded completely
Events Fire Multiple Times
Cause: Multiple instances of GTM or tracking code
Solution:
- Check for duplicate GTM snippets in theme
- Verify only one GTM plugin is active
- Disable other tracking plugins temporarily to isolate issue
GA4 Events Not Showing
Wait time: Events can take 24-48 hours to appear in standard reports
Use DebugView for instant verification:
- Admin → DebugView
- Events appear immediately for testing
Forms Not Tracking
Check:
- Form tracking is enabled in ADT settings
- Form vendor is supported (see supported vendors below)
- Form has a unique ID or name attribute
- No form vendor plugin conflicts
Supported Form Vendors
Advanced DataLayer Tracker automatically detects and tracks forms from these platforms:
Free WordPress Form Plugins:
Marketing Platform Forms (Premium)
Next Steps
You now have basic tracking running. Here’s what to do next:
Week 1: Enable Advanced Features
Session Manager (Premium):
- Persistent cross-page tracking
- Session quality scoring
- Intelligent event persistence
Full guide: Session Management Guide
Content Intelligence (Premium):
- Automatic content type detection
- Section-level engagement tracking
- CTA exposure analysis
Week 2: Optimize Based on Data
Form Optimization:
- Review form_start vs form_submit ratios
- Identify high-abandonment forms
- Enable field-level tracking for detailed analysis
Content Strategy:
- Compare active_time across content types
- Identify high-performing pages
- Optimize low-engagement content
Traffic Analysis:
- Review UTM data for campaign performance
- Build audience segments based on engagement
- Adjust marketing spend based on quality traffic
Month 1: Advanced Implementation
Attribution Modeling:
- Enable session attribution summaries
- Implement multi-touch attribution
- Weight conversions by session quality
E-commerce Optimization:
- Track checkout abandonment step-by-step
- Identify product view patterns
- Optimize based on purchase behavior
Video Marketing:
- Analyze video completion rates
- Segment audiences by video engagement
- Create remarketing audiences for video viewers
Getting Help
Documentation Resources
Quick Reference: Quick Reference Guide
Fast-access cheat sheet for common tasks
Complete Documentation: Complete Event Guide
In-depth guide to all 40+ events
Feature Guides:
Developer Resources
Developer Reference: Developer Guide
Custom event implementation and API documentation
Installation Guide: Installation Guide
Technical setup and configuration
Diagnostic Tools
Debug Overlay:
- Real-time event monitoring
- Session data inspection
- Performance metrics
Bookmarklet Tools:
- One-click health checks
- Comprehensive diagnostics
- Feature validation
Success Metrics
Track these metrics to measure ADT’s impact:
Week 1
- Events firing correctly
- Data flowing to GA4/GTM
- Debug overlay working
- No JavaScript errors
Month 1
- Active time data collected
- Form abandonment identified
- Content performance analyzed
- First optimizations implemented
Quarter 1
- Measurable conversion rate improvements
- Better traffic quality from optimized campaigns
- Data-driven content strategy
- ROI positive from optimizations
Key Takeaways
Remember:
- active_time is your most important metric – it measures TRUE engagement, not just time with tab open
- session_engagement_summary provides complete journey analysis in one event
- form_start vs form_submit reveals where users drop off
- Debug overlay is your best friend for troubleshooting
- GTM integration provides maximum flexibility for future growth
You’re now tracking like the enterprise!
Start with core events, verify they’re working, then gradually enable advanced features as needed. ADT grows with your needs.
Frequently Asked Questions
What is WordPress DataLayer tracking setup?
WordPress DataLayer tracking setup involves configuring a DataLayer object that captures user interactions, form submissions, page views, and engagement metrics. Advanced DataLayer Tracker automates this process with zero coding required.
How do I set up Google Tag Manager with WordPress?
The Google Tag Manager WordPress setup guide in this tutorial shows you how to export ADT’s GTM container JSON, import it to your GTM account, and publish. The entire process takes about 5 minutes.
What makes a good WordPress form tracking plugin?
A WordPress form tracking plugin should automatically detect form starts, submissions, and field-level interactions across all major form builders. ADT supports Gravity Forms, Contact Form 7, WPForms, Formidable Forms, and more.
What is WordPress analytics active time tracking?
WordPress analytics active time tracking measures actual user engagement (mouse movement, scrolling, clicks) rather than just time with tab open. This provides accurate engagement data instead of inflated metrics from background tabs.
Is this a complete WordPress event tracking tutorial?
Yes, this WordPress event tracking tutorial covers setup, configuration, verification, and troubleshooting for 40+ tracking events including page views, engagement, forms, e-commerce, and video interactions.
Additional Resources
- Installation Guide
- First Successful Event Guide
- Complete Event Guide
- Feature Carousel
- Knowledge Base Home
Version: 1.0
Last Updated: October 2025
Plugin: Advanced DataLayer Tracker