Installation Guide
WordPress Analytics Installation: Complete Setup Guide
Overview
This WordPress analytics installation guide walks you through installing Advanced DataLayer Tracker on your WordPress site. Whether you’re setting up for the first time or migrating from another tracking solution, you’ll have everything configured in 15-20 minutes.
What You’ll Learn:
- Plugin installation methods
- Initial configuration
- Feature activation
- Integration options
- Verification steps
Prerequisites:
- WordPress 5.0 or higher
- PHP 7.4 or higher
- Admin access to your WordPress site
WordPress Analytics Installation Methods
Choose the WordPress analytics installation method that works best for you:
Method 1: WordPress Analytics Installation via Plugin Directory (Recommended)
Easiest installation method for most users
Steps:
- Log into WordPress Admin
- Navigate to: Plugins → Add New
- Search for: “Advanced DataLayer Tracker”
- Click Install Now on the ADT plugin
- Click Activate when installation completes
Verification:
- New menu item appears: Settings → Advanced DataLayer
- No error messages displayed
- Plugin shows as “Active” in plugin list
Learn more about installing WordPress plugins from the official documentation.
Method 2: Upload Plugin ZIP File
Best when you have the plugin file from another source
Steps:
- Download the plugin ZIP file to your computer
- Log into WordPress Admin
- Navigate to: Plugins → Add New
- Click Upload Plugin button (top of page)
- Click Choose File and select the ZIP file
- Click Install Now
- Click Activate Plugin when installation completes
Verification:
- Plugin appears in Plugins → Installed Plugins
- Status shows “Active”
- No PHP errors in admin
Method 3: FTP/SFTP Upload
For users comfortable with FTP or hosting file managers
Steps:
- Download and extract the plugin ZIP file on your computer
- Connect to your site via FTP/SFTP
- Navigate to:
/wp-content/plugins/ - Upload the entire
advanced-datalayer-trackerfolder - In WordPress Admin, go to: Plugins → Installed Plugins
- Find “Advanced DataLayer Tracker”
- Click Activate
File structure should be:
/wp-content/plugins/advanced-datalayer-tracker/
    ├── advanced-datalayer-tracker.php (main file)
    ├── includes/
    ├── assets/
    └── readme.txt
WordPress Analytics Initial Configuration
Now that your WordPress analytics installation is complete, let’s configure the basics., let’s configure the basics.
Step 1: Access Your WordPress Analytics Installation Settings
- Navigate to: Settings → Advanced DataLayer in WordPress Admin
- You’ll see the ADT settings dashboard with multiple tabs
Main tabs available:
- Core Settings – Enable/disable features
- GTM Export – Generate GTM container
- GA4 Settings – Configure Measurement Protocol
- Consent Management – Privacy compliance
- Pixel Manager – Third-party integrations
- Advanced – Performance and debugging options
Step 2: Configure Core Settings
Navigate to the Core Settings tab
Essential settings to configure first:
Page Tracking:
- Enable: Page View Tracking
- Purpose: Foundation event for all tracking
- Default: Enabled
Session Management:
- Enable: Session Tracking
- Purpose: Groups user actions into sessions
- Creates persistent session ID across pages
- Default: Enabled
Engagement Tracking:
- Enable: Active Time Tracking (highly recommended)
- Purpose: Measures TRUE user engagement
- Tracks only when user is actively interacting
- Default: Enabled
- Enable: Scroll Depth Tracking
- Purpose: Measures content consumption
- Fires at 25%, 50%, 75%, 100% scroll depth
- Default: Enabled
Form Tracking:
- Enable: Form Tracking
- Purpose: Tracks form starts and submissions
- Automatically detects supported form plugins
- Default: Enabled if forms detected
Click Tracking:
- Enable: Click Tracking
- Purpose: Tracks link clicks, button interactions
- Filters internal vs external links
- Default: Disabled (enable if needed)
Save your changes after enabling features.
Step 3: Choose Your Integration Path
ADT supports multiple integration methods. Choose the one that fits your needs:
Best for:
Option A: Google Tag Manager (Most Popular)
- Sending data to multiple platforms (GA4, Meta, TikTok, etc.)
- Marketing teams needing no-code control
- Sites using A/B testing tools
- Maximum flexibility
Setup time: 10-15 minutes
Quick setup:
- Click GTM Export tab
- Select features to include
- Generate and download JSON file
- Import to Google Tag Manager
- Publish container
Full guide: Google Tag Manager Setup Guide
Option B: GA4 Measurement Protocol (Server-Side)
Best for:
- Direct GA4 connection only
- Enhanced privacy compliance
- Ad blocker resistance
- Server-side tracking preference
Setup time: 5-10 minutes
Quick setup:
- Click GA4 Settings tab
- Enter GA4 Measurement ID (G-XXXXXXXXXX)
- Enter API Secret (from GA4 admin)
- Configure server-side events
- Save settings
Full guide: GA4 Measurement Protocol Setup Guide
Option C: Pixel Manager Integration
Best for:
- Sites already using third-party pixel managers
- Need compatibility with existing tracking
- Using platforms like PixelYourSite, GTM4WP, etc.
Setup time: 5 minutes
Quick setup:
- Ensure pixel manager plugin is installed
- ADT automatically populates dataLayer
- Configure pixel manager to read ADT events
- No additional ADT configuration needed
Full guide: Pixel Manager Guide
Option D: Multiple Integrations
You can use multiple integration methods simultaneously:
- GTM for marketing platforms
- GA4 MP for server-side backup
- Pixel manager for specific tools
This provides redundancy and maximizes data collection.
Step 4: Configure Consent Management
IMPORTANT: Proper consent configuration ensures privacy compliance.
Navigate to: Consent Management tab
If using a Consent Management Platform (CMP):
Supported platforms:
- OneTrust
- Cookiebot
- CookieYes
- Complianz
- Cookie Notice
- WP Cookie Consent
- Borlabs Cookie
- GDPR Cookie Compliance
- Custom/Other
Setup steps:
- Select your CMP from the dropdown
- Map consent categories to tracking features:
- Analytics consent → Page views, engagement, sessions
- Marketing consent → UTM tracking, attribution
- Advertising consent → Pixels, remarketing tags
- Save settings
Behavior:
- Events respect user consent choices
- Only enabled features fire when consent is granted
- Consent changes take effect immediately
- No data sent before consent granted
If NOT using a CMP:
Select “No Consent Platform”
- All events fire immediately when enabled
- User consent not required
- Consider your privacy obligations
Full guide: Consent Management Guide

Step 5: Configure Advanced Settings (Optional)
Navigate to: Advanced tab
Performance options:
Event Queue:
- Purpose: Batches events for performance
- Reduces network requests
- Recommended: Leave enabled
- Default: Enabled
Debug Mode:
- Purpose: Enables detailed console logging
- Shows all event data in browser console
- Recommended: Enable during setup, disable in production
- Default: Disabled
DataLayer Name:
- Purpose: Customize dataLayer variable name
- Default:
dataLayer(standard GTM name) - Change only if required by your setup
Session Timeout:
- Purpose: Defines when a session expires
- Default: 30 minutes of inactivity
- Adjust based on your site’s typical engagement
Cookie Domain:
- Purpose: Sets domain for tracking cookies
- Default: Auto-detected
- Override only for multi-domain setups
Feature Activation Guide
Now that core settings are configured, let’s enable specific features based on your needs.
E-commerce Tracking (WooCommerce)
Requirements:
- WooCommerce plugin installed and active
- Products configured in WooCommerce
Setup:
- Navigate to: Core Settings tab
- Find E-commerce Tracking section
- Enable: WooCommerce Integration
- Configure events to track:
- view_item (product page views)
- add_to_cart
- remove_from_cart
- view_cart
- begin_checkout
- purchase
- Save changes
Events automatically fire:
- When users view products
- Add/remove from cart
- View cart page
- Start checkout
- Complete purchase
Full guide: E-commerce Tracking Guide
Video Tracking
Automatically detects:
- YouTube embeds
- Vimeo embeds
- HTML5 video elements
Setup:
- Navigate to: Core Settings tab
- Enable: Video Tracking
- Configure tracking points:
- 0% (start)
- 25% (quarter point)
- 50% (midpoint)
- 75% (three-quarter)
- 90% (near complete)
- 100% (complete)
- Save changes
Events track:
- video_start
- video_progress (at each milestone)
- video_complete
- video_pause
Form Tracking (Advanced)
Automatically detects:
- Gravity Forms
- Contact Form 7
- WPForms
- Formidable Forms
- Marketo forms
- HubSpot forms
- Generic HTML forms
Setup:
- Navigate to: Core Settings tab
- Enable: Form Tracking
- Enable: Field-Level Tracking (for detailed analysis)
- Select form vendors to track
- Save changes
Events tracked:
- form_start (first field interaction)
- form_complete (completed field interaction)
- form_submit (successful submission)
- form_abandon (start field and empty it)
- form_field_interaction (field-level detail)
Field-level tracking reveals:
- Which fields cause abandonment
- Time spent on each field
- Error-prone fields
- Completion patterns
UTM & Attribution Tracking
Captures campaign data automatically
Setup:
- Navigate to: Core Settings tab
- Enable: UTM Parameter Tracking
- Enable: Attribution Tracking
- Configure attribution windows (optional)
- Save changes
Automatically captures:
- utm_source
- utm_medium
- utm_campaign
- utm_term
- utm_content
- First touch attribution
- Last touch attribution
- Multi-touch journey data
Full guide: Attribution in Session Management Guide
Premium Features (Optional)
Session Manager (Premium):
- Cross-page session persistence
- Session quality scoring
- Advanced attribution modeling
- Intelligent event aggregation
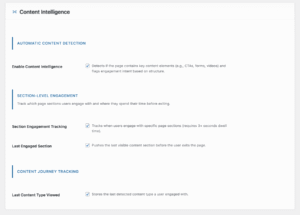
Content Intelligence (Premium):
- Automatic content type detection
- Section-level engagement tracking
- CTA exposure analysis
- Intent scoring
Setup: Contact support for premium feature activation
Full guide: Session Management Guide
WordPress Analytics Installation Verification & Testing
After completing your WordPress analytics installation, let’s verify everything is working correctly.
Step 1: Check Plugin Status
In WordPress Admin:
- Navigate to: Plugins → Installed Plugins
- Verify “Advanced DataLayer Tracker” shows Active
- No error messages displayed
- Version number visible
Check for conflicts:
- Deactivate other tracking plugins temporarily
- Test if ADT works properly
- Reactivate one at a time if conflicts occur
Step 2: Verify Events Are Firing
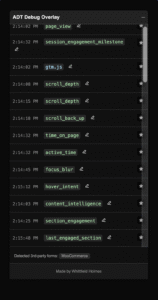
Using Debug Overlay (Recommended):
- Visit your website (frontend, not admin)
- Open browser console (F12)
- Type:
ADT.debugOverlay.open() - Debug overlay appears on screen
What to verify:
- Session ID displays
- page_view event fires immediately
- Scroll page → scroll_depth events at 25%, 50%, 75%, 100%
- Wait 30s with activity → active_time event fires
- No error messages in overlay
Full guide: First Successful Event Guide
Using Browser Console:
- Open console (F12)
- Type:
dataLayer - Press Enter
- Should see array of events
- Each event contains name and parameters
Example output:
[
  {
    event: "page_view",
    page_location: "https://yoursite.com/page",
    page_title: "Page Title",
    session_id: "sess_xxxxx"
  },
  {
    event: "scroll_depth",
    scroll_percent: 25,
    time_to_scroll: 5.2
  }
]
Using Google Tag Manager Preview:
If using GTM integration:
- Open Google Tag Manager
- Click Preview button
- Enter your website URL
- GTM preview panel opens
- Navigate your site
- Events appear in real-time
Verify:
- Tags fire correctly
- Triggers activate as expected
- Variables populate with data
- No tag errors shown
Using GA4 DebugView:
If using GA4 Measurement Protocol:
- Open Google Analytics 4
- Navigate to: Admin → DebugView
- Visit your website
- Events appear within seconds
Verify:
- Events show correct names
- Parameters populate correctly
- Event count increments
- No error events
Step 3: Test Key Features
Test each enabled feature:
Page Views:
- Visit multiple pages
- Each should fire page_view event
- page_location and page_title should update
Scroll Depth:
- Scroll to 25% → event fires
- Continue to 50%, 75%, 100%
- Each fires separate event
Active Time:
- Stay on page with activity
- Every 30 seconds → active_time event
- Verify cumulative time increases
Forms:
- Click into form field → form_start fires
- Complete and submit → form_submit fires
- Check form_name parameter matches
E-commerce (if enabled):
- View product → view_item fires
- Add to cart → add_to_cart fires
- Complete checkout → purchase fires
Video (if enabled):
- Play video → video_start fires
- Watch to milestones → video_progress fires
- Complete video → video_complete fires
Common WordPress Analytics Installation Issues
Use this WordPress analytics installation checklist to ensure complete setup:
Issue: Plugin Won’t Activate
Possible causes:
- PHP version too old
- WordPress version too old
- File permissions incorrect
- Conflicting plugin
Solutions:
Check requirements:
- PHP 7.4+ required (check in hosting dashboard)
- WordPress 5.0+ required
- Update if needed
Check file permissions:
Directories: 755
Files: 644
Check for conflicts:
- Deactivate all other plugins
- Try activating ADT
- If successful, reactivate plugins one by one
- Identify conflicting plugin
Issue: Settings Page Missing
Possible causes:
- Plugin not fully activated
- User permissions insufficient
- WordPress menu cache issue
Solutions:
Verify activation:
- Plugins → Installed Plugins
- ADT should show “Deactivate” link (not “Activate”)
Check user permissions:
- Must be Administrator role
- Must have
manage_optionscapability
Clear WordPress cache:
- If using caching plugin, clear cache
- Hard refresh browser: Ctrl+Shift+R (Windows) or Cmd+Shift+R (Mac)
- Try different browser
Issue: Events Not Firing
Possible causes:
- Features not enabled
- JavaScript errors on page
- Consent blocking events
- GTM not installed (if using GTM)
Solutions:
Enable features:
- Settings → Advanced DataLayer → Core Settings
- Verify toggles are ON for desired features
- Save changes
- Reload website page
Check for JavaScript errors:
- Open browser console (F12)
- Look for red error messages
- Resolve conflicts
- Common culprits: theme JS, other plugins
Check consent:
- If using CMP, grant all consents for testing
- Or temporarily disable consent requirements
- Verify events fire with full consent
Verify GTM installed:
- View page source
- Search for “GTM-“
- Should find container ID in code
- If missing, install GTM snippet
Issue: Duplicate Events
Possible causes:
- Multiple tracking plugins active
- GTM installed multiple times
- Theme includes tracking code
Solutions:
Check for duplicate plugins:
- Deactivate other GA4/GTM plugins
- Test if duplicates stop
- Use only one tracking solution
Check GTM installations:
- View page source
- Count instances of “GTM-“
- Should appear exactly twice (head + body)
- Remove duplicates from theme if found
Check theme code:
- Review theme’s header.php
- Look for hardcoded analytics
- Remove or disable
Issue: Database Errors
Possible causes:
- Database connection issue
- Table creation failed
- Insufficient permissions
Solutions:
Check error logs:
- Enable WordPress debugging
- Add to wp-config.php:
define('WP_DEBUG', true);
define('WP_DEBUG_LOG', true);
- Check /wp-content/debug.log
- Look for ADT-related errors
Manual table creation: If automatic table creation failed, contact support for manual SQL scripts.
WordPress Analytics Installation Checklist
Use this checklist to ensure your WordPress analytics installation is complete:
Installation:
- [ ] Plugin installed via one of the three methods
- [ ] Plugin activated successfully
- [ ] No error messages displayed
- [ ] Settings page accessible
Configuration:
- [ ] Core features enabled (page views, sessions, engagement)
- [ ] Integration method chosen and configured
- [ ] Consent management configured (if using CMP)
- [ ] Advanced settings reviewed
Feature Activation:
- [ ] Essential features enabled (active_time, scroll, forms)
- [ ] E-commerce enabled (if using WooCommerce)
- [ ] Video tracking enabled (if using videos)
- [ ] UTM tracking enabled
Verification:
- [ ] Debug overlay opens and shows events
- [ ] dataLayer populates correctly
- [ ] GTM preview shows events (if using GTM)
- [ ] GA4 DebugView shows events (if using GA4)
- [ ] Key features tested and working
Testing:
- [ ] Page views fire on all page types
- [ ] Scroll events fire at correct percentages
- [ ] Forms track start and submit
- [ ] No JavaScript errors in console
- [ ] No PHP errors in WordPress
Documentation:
- [ ] Quick Start Guide reviewed
- [ ] First Event Guide completed
- [ ] Team trained on debug tools
- [ ] Integration guides bookmarked
Next Steps
You’ve successfully completed your WordPress analytics installation and configured Advanced DataLayer Tracker. Here’s what to do next:
Immediate (Today)
Verify tracking is working:
- Visit multiple pages on your site
- Test all enabled features
- Check data in GTM/GA4
- Resolve any issues found
Explore the Debug Overlay:
- Learn keyboard shortcuts
- Review event parameters
- Monitor session data
- Export test data
Guide: First Successful Event Guide
This Week
Enable advanced features:
- Video tracking (if applicable)
- Field-level form tracking
- Advanced e-commerce events
- Attribution tracking
Set up analytics:
- Create GA4 custom reports
- Configure GTM tags for other platforms
- Build audience segments
- Set up conversion goals
Guide: Complete Event Guide
This Month
Optimize based on data:
- Review form abandonment rates
- Analyze content engagement (active_time)
- Identify high-quality traffic sources
- Optimize low-performing pages
Implement advanced tracking:
- Session quality scoring
- Content intelligence
- Multi-touch attribution
- Custom events
Guide: Engagement Tracking Guide
Ongoing
Monitor and maintain:
- Review weekly analytics
- Update tracking as site changes
- Add new events for new features
- Train team on new capabilities
Optimize continuously:
- A/B test based on insights
- Refine audience segments
- Improve conversion funnels
- Enhance user experience
Additional Resources
Documentation
Getting Started:
Feature Guides:
- Session Management Guide
- Engagement Tracking Guide
- E-commerce Tracking Guide
- Consent Management Guide
Integration Guides:
Reference:
Support
Before contacting support:
- Check this Installation Guide
- Review relevant feature guides
- Test with Debug Overlay
- Check browser console for errors
- Verify all requirements met
When contacting support, include:
- WordPress version
- PHP version
- Plugin version
- List of active plugins
- Description of issue
- Steps to reproduce
- Screenshots of errors
- Console error messages
Troubleshooting Resources
Debug Overlay:
- Real-time event monitoring
- Session data inspection
- Export capabilities
- Performance metrics
Browser Console:
- JavaScript error detection
- dataLayer inspection
- Network request monitoring
- Debug logging
GTM Preview Mode:
- Tag firing verification
- Trigger testing
- Variable inspection
- Container debugging
GA4 DebugView:
- Event verification
- Parameter checking
- Real-time monitoring
- Error detection
Best Practices
During Installation:
- Test on staging site first (if available)
- Back up your site before installing
- Keep other plugins updated
- Document any customizations
After Installation:
- Enable features gradually
- Test each feature individually
- Monitor performance impact
- Review data quality regularly
Ongoing Maintenance:
- Keep plugin updated
- Review release notes
- Test after WordPress updates
- Monitor for conflicts
Data Quality:
- Use Debug Overlay during setup
- Verify events in multiple tools
- Cross-check data sources
- Audit configuration quarterly
Security Considerations
Data Privacy:
- Configure consent management properly
- Respect user privacy choices
- Document data collection practices
- Comply with applicable regulations (GDPR, CCPA, etc.)
Access Control:
- Limit plugin settings access to administrators
- Review user capabilities
- Secure API credentials
- Use strong passwords
Performance:
- Monitor page load impact
- Enable event queue batching
- Optimize for mobile devices
- Test with performance tools
Success Metrics
Track these metrics to measure your successful WordPress analytics installation:
Day 1:
- Plugin activated without errors
- Settings page accessible
- Debug overlay showing events
- No JavaScript conflicts
Week 1:
- All core events firing correctly
- Data flowing to analytics platform
- No duplicate events
- Team trained on basics
Month 1:
- Advanced features enabled
- Data-driven insights emerging
- First optimizations implemented
- Positive ROI tracking
Congratulations! You’ve successfully completed your WordPress analytics installation with Advanced DataLayer Tracker. You now have enterprise-level tracking on your WordPress site with zero coding required.
Start with core events, verify they work, then gradually enable advanced features as needed. The plugin grows with your requirements.
Version: 1.0
Last Updated: October 2025
Plugin: Advanced DataLayer Tracker